


The Captivating World of Carving Pumpkins
Halloween is soon, and for a lot of people, that means carving up a jack o’lantern. For people like me, I’m lucky if I don’t cut myself, but for others, it’s an art form. One of those “others” is Ray Villafane, a New Yorker who has been an artist his whole life. He graduated from the School of Visual Arts and then taught art for over ten years. He moved into clay and wax sculptor, and after becoming very successful with those mediums, he decided to turn his pumpkin-carving hobby up a notch.
In 2007, he participated in Food Network’s “Outrageous Pumpkins” challenge, where he won three rounds to receive the grand prize. He came back two years later to defend the title, and won again. 2011 was a big year for Ray – he carved the world’s biggest pumpkin into zombies, and was commissioned to do carved pumpkins for Heidi Klum’s Halloween party.
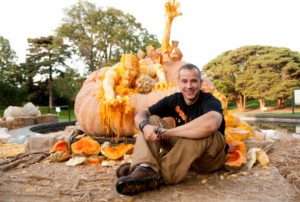
Ray and the world’s biggest pumpkin carving Photo by: Ivo M. Vermeulen
Ray’s zombie carving is quite a sight to behold. The pumpkin weighed nearly 2000 pounds. Ray’s approach had him keep much of the original pumpkin intact, but he made it appear as if it was cracking open, birthing zombies from its flesh. You can watch a video of his process here. The carving was on display at the New York Botanical Garden.
Ray has inspired at least one man to transform his carving skills. Simon Patel watched Ray, and thought, “I should try some different designs!” He spent hours and hours working on his skills. Over 7 years, he estimates he’s carved at least 100 pumpkins. His personal favorite is a zombie, with eyes so well-carved people thought they were made of glass.
Carving pumpkins – a new business
Some carvers have turned their skills into a full-fledged business. Maniac Pumpkin Carvers began with two friends who had worked as artists together for over 20 years. They started out in a basement apartment and after word-of-mouth had them filling commissions for Martha Stewart and the New York Yankees, they know have a seasonal pop-up store.

Pumpkins don’t have to be scary; they can be beautiful, too.
To up your pumpkin-carving game, the Maniac Pumpkin Carvers has some key pieces of advice. First, you want to chose a pumpkin that has a very green stem. A thick stem usually means the walls of the pumpkin will be thick, which is great for carving. Before cutting into your chosen pumpkin, you want your design drawn out. The Maniacs actually draw with marker right on the pumpkin instead of free-carving. As soon as you cut into it, the pumpkin starts to lose moisture, so you want to work fast and you want to have a spray bottle of water nearby. The Maniac Crew won’t start working on a design until about 24 hours before the deadline, and then they will work through till it’s done, which can sometimes take 10 hours.
Carving pumpkins techniques
A creative and enjoyable activity, carving pumpkins is perfect for the Halloween season. Here is what you need to do for producing beautiful pumpkin carvings:
The best pumpkin to choose has a flat base and can be positioned firmly. Check to see if it is smooth, firm, and ripe. In order to carve elaborate designs into your pumpkin, you’ll need a sharp knife or other carving tools, a marker or pen, a spoon or scoop, and possibly a tiny saw or drill.
Before you begin carving, make a rough draft of your design on paper or directly on the pumpkin using a marker or pen. You can use this to direct your carving process and visualize the finished product.
Start with the lid. To make a lid for your pumpkin, cut a circle or a hexagonal form at a 45-degree angle around the stem. As a result, when the pumpkin is lit, the lid won’t accidentally fall inside.
Take the pulp and seeds out of the pumpkin with a spoon or a scoop. Make the interior walls about an inch thick by scraping them. If you intend to roast the seeds in the future, save them.

![]()
Cutting technique for carving pumpkins
Gradual carving
Begin by chopping the sections with the most minute details first, then go on to the bigger, more open areas. By doing this, sensitive areas will be less likely to break accidentally.
Use a variety of depths
Carve the pumpkin in various places at various depths to add depth and shading. For lighter colors, scrape off the top layer of skin; for darker hues, go deeper.
Think about various methods
Along with standard carving, you may try etching, which entails scraping the pumpkin’s outer layer to reveal a lighter design, or drilling patterns into the pumpkin to provide a distinctive result.
When you’re finished carving your pumpkin, you can prolong its life by applying petroleum jelly or vegetable oil to the sliced edges to seal in moisture.
Place your design on the pumpkin’s exterior using tape or pins. Make holes on the pumpkin following the lines of your design using a pointed item, such as a needle or toothpick. Use a small, serrated knife or other pumpkin carving instrument to gently carve the design’s outline to start carving. To prevent the cut-out pieces from falling inside the pumpkin, be sure to slightly slant the knife as you press it.
To prevent mishaps, keep an eye out for your surroundings and carve slowly. Always keep an eye on youngsters while they are cutting, and think about using pumpkin carving tools that are made for safer use. Cheers to carving pumpkins!
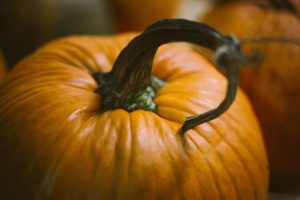
You want to leave that curly guy on your pumpkin
Some other tips to remember
Don’t cut off the top or the vine; the pumpkin will rot faster without it. To put lights inside, the Maniacs cut a hole in the back of the pumpkin.
Never leave any bits of goop in your pumpkin because it will rot.
Use LED or CFL lights, because candles heat up the pumpkin and hasten its decay.
If you are carving a pumpkin for an event, keep your finished product in the fridge as soon as possible before display.
Another autumn tradition is the pumpkin spice latte. How did “pumpkin spice” become such a big thing?